Sunday, November 25, 2012

Battle on the Coa - Refight the Second

Battle of the Coa River Bridge. French Commander Rob O. contemplates the destruction of Crauford's Light Division.

Battle Report provided by Der Alte Fritz

We enjoyed our Battle of the Coa River Bridge scenario so much that we thought that we would try it again on November 10, 2012. The British team counted on their experiences from the first game to help them come up with a winning strategy that would allow them to retreat across the Coa River with minimal losses. click on the link below to see how the previous Coa scenario turned out.

Previous Coa River Refight

As before, the British army was vastly outnumbered by the attacking French corps of Marshal Ney.

British Left Flank

83rd Regt (84 figures)
94th Regt (84 figures)
Portuguese Cacadores - Rifles (12 figures)

British Centre

9th Regiment (110 figures)
5th Regiment (100 figures)
Grant's RHA battery (six 6-pounders)
1/95th Rifles (one company of 12 figures)


British Right Flank

Royal Marines (32 figures)
1/95th (36 figures in 3 coys)
5/60th (36 figures in 3 coys)

British Light Cavalry Brigade:
2 sqds 15th Hussars (24 figures)
2 sqds 16th Light Dragoons (24 figures)


Total British Forces:

420 infantry
96 Rifles
6 x 6pdrs RHA
48 Light Cavalry


Marshal Ney's French VI Corps

I don't recall exactly how many French there were or what their specific regiments were, but memory indicates the following:

French Right Wing - 3 btns of 72 figures
French Centre - 3 btns of 72 figures
French Left - 4 btns of 72 figures
French field artillery (3x 8pdrs and 1 x 5" howitzer)
20th Dragoon - 40 figures
Vistula Lancers - 20 figures
1st Chasseurs - 24 figures
Italian Chasseurs - 20 figures

Total French Forces:

720 Infantry
6 cannon
104 Light Cavalry


The Coa River and the single bridge representing the British Light Division's line of retreat.

Grant's battery of RHA deploys on one of the ridges awaiting the French attack.

Three companies of the 5/60th Rifles deploy in front of the Coa river crossing.
I had thought that our plan was to place all of the British Rifles on the other side of the Coa River, from whence they could provide covering fire with their long range rifle fire. Using rested fire and elite firing bonuses, the combined 72 rifles should have posed a challenge to the French. In practice, half of the Rifles deployed on the wrong side of the river and there was only a half regiment of Marines to cover the bridge. I had imagined that a full regiment of 100+ British infantry were going to be deployed to cover the bridge. Somehow our plans were misinterpreted or incorrectly implemented.

In all of the excitement of the pre-battle planning and game setup, I never got around to calling the other British players together to form a battle plan. We all sort of knew what the scenario was and the problems that we had to contend with, but without an overall plan, we were doomed. This loss is on me.


Two companies of the 1/95th Rifles provide cover on the far side of the Coa crossing.

Ney's Corps commences the attack on the British left flank, defended by the 83rd Regt. of Foot.

The picture above shows four battalions of French infantry attacking the 83rd Regiment, holding the British left flank, from the front, while another three battalions of infantry, shown below, attacked from the flank. Thus, the 83rd were in a salient of sorts and about to receive seven French battalions within a couple of game turns. Ouch.

The French attack the British left from front and from the flank. Voltigeur companies preceed the advance of the French infantry brigades.

Grant's RHA battery opens a deadly salvo on its French artillery counterpart early in the game.
British center

The British center was held by two 110 figure battalions of infantry, holed up in several haciendas.They faced off against one of the French brigades (3 btns of 72 figures), the French artillery, and all of the French cavalry.

The French attack from the front advances into musketry range.  Note the officer and the ADC with his message. The message will be read on the following turn. Players are not allowed to talk tactics with one another during the game unless either their generals stands are in base to base contact, or a message has been delivered by courier.

The British left flank is also threatened by another brigade of French infantry. Things are not looking good for the Red Coats today.

Marshal Ney (foreground): "Plans? Our plans are to destroy zee Rosbifs!"

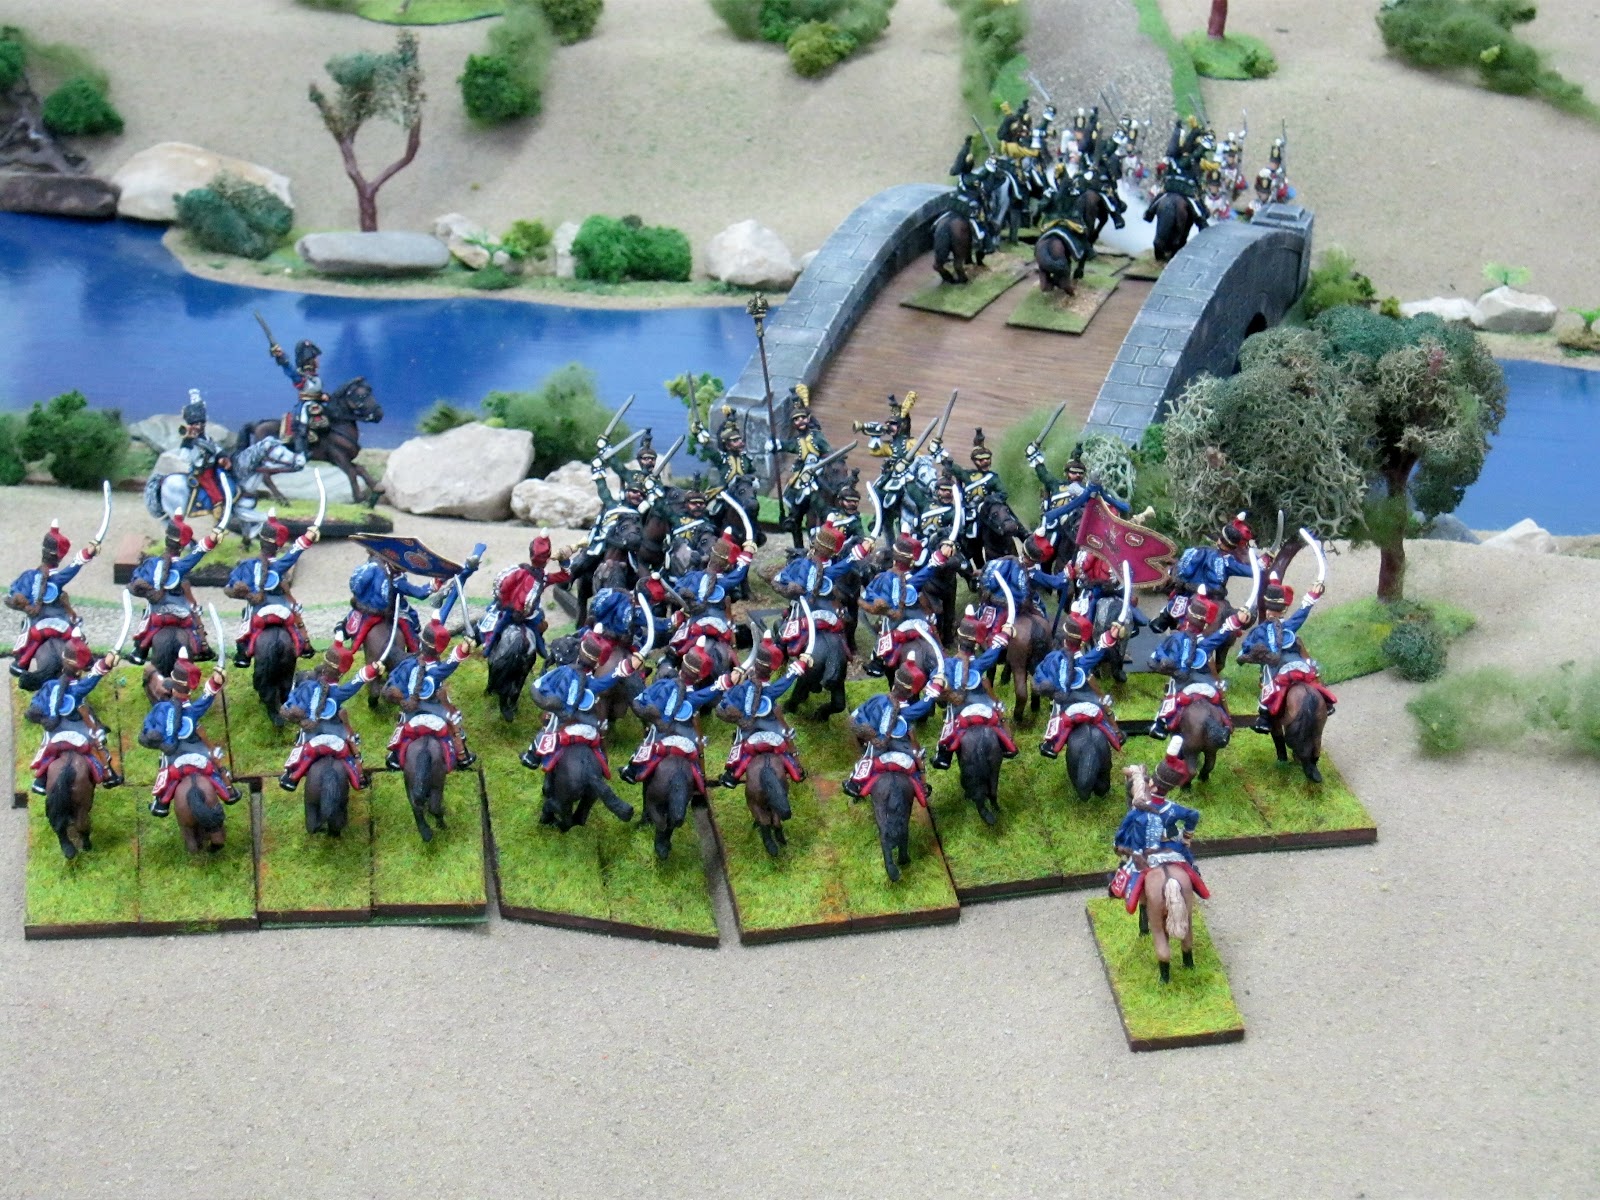
As in the previous game, the French strategy was to attack the British left flank from two directions and smash this part of the British army. At the same time, all of their cavalry and a brigade of infantry would race towards the Coa River bridge and attempt to capture it or otherwise cut off the British line of retreat across this single choke point.

The British only had a half regiment of British Marines (36 figures) and five companies of Rifles to hold the bridge and escape route. Somehow, the British failed to make any plans prior to the start of the battle, as a result, there was no significant force on the British right flank available to defend the bridge. The French successfully cut off the line of retreat across the Coa, and I daresay that Marshall Ney probably bagged the entire Light Division.

Needless to say, it was a very sad day back in Lisbon at general headquarters.

"Sacre Bleu! Zee plan is working!"


Wednesday, September 19, 2012

CAMPAIGNS IN IBERIA

SOLVES A PROBLEM Part 2 (Finis)
----------------------------------------
Date: 25 August, 1810/2012

Location: Between Almeida and the Coa River Bridge

Rules: Batailles de l'Ancien Régime {BAR} adapted to Napoleonics

Situation: An outnumbered British force at first stands to fight and then must scramble to the Coa River Bridge to escape.

For Part 1 see: http://barnapoleon.blogspot.com/2012/09/campaigns-in-iberia-solves-problem-date.html

------------------------------------

PREVIOUSLY AT THE COA RIVER BRIDGE

We left Captain Magoo's unsupported 5th Foot Grenadier Company about to receive a charge from French Dragoons. The French arrived unmolested solely because for a time they were unseen by officers one inch tall down on the table in the British main battle line. Those metal fellows had to first see the threat develop, write a message about it and send a courier to reserves to react. Then reserves had to comprehend orders and act properly. Thus, several turns transpired whilst the French galloped for the bridge. A success for them there would close the exit route for the British Army. A humiliating disaster was pending.

The natural delays above were important because Captain Magoo's situation would not have otherwise happened. Towering above the tabletop I saw the French coming. I could have unrealistically sent British forces to the area very early in the game. However, I held my reserves back waiting for orders to move.

We also had sighting rules. Officers in the main battle line were required to throw percentage dice to observe enemy forces far away. Luckily they did. However, our isolated grenadier captain failed every opportunity to see the threat developing. He was therefore named Magoo after the nearly blind cartoon character.

Now back to the game.

Captain Magoo finally sees the French cantering toward his men.

Magoo: "Stand quietly boys and do your duty. The French are coming. Make ready!"

Magoo: "Present. FIRE!"

In spite of losses, the dragoons crashed into the grenadiers and a melee was fought. Elsewhere....

Reserves were finally reacting. The horse artillery battery deployed and the light cavalry brigade arrived. Without a courier this could not have happened. Without natural courier system delays this would have happened much earlier.

Now officers on the spot take charge. The horse artillery battery shifts to the right, fires and limbers move back allowing the light cavalry to wheel right and head for the Coa River Bridge.

Right Flank British forces more forcefully attend to securing the bridge. A French lancer regiment is greatly reduced at the top of the photo and a second squadron of French dragoons is not ignored either. Lord Paget's Light Cavalry Brigade canters forward in a column of squadrons.

As Captain Magoo fights his melee at the other end of the bridge, the 15th Hussars engage the French.

We turn around to see things from the other side of the bridge. The eventual result is French forces are defeated, the bridge is secured for now and....

The light cavalry wheels left to pursue fleeing enemy cavalry to the French Back Table. The bridge off image to the middle right is safe for now.

The cleared exit route enables the retreat to commence. Note Captain Magoo's grenadiers to the right of the bridge. He lost three miniatures. "Oh Magoo. You've done it again!" However, let us turn our attention away from the British Right Flank to....

The British Left Flank where French infantry surges toward the red coats.

Two French battalions to the left of the previous image also move forward.

The French can not be stopped and so....

The British retreat toward the Coa River Bridge.

The retreat continues behind a walled hacienda.

While the French assault it.

A stand is made behind the hacienda.

The British edge backwards though a foothold in the hacienda exists.

The loss of the hacienda is inevitable.

Expecting the French soon, the British horse battery turns to engage the flood of French while....

A final British line is established in the upper right of the image. We have returned to the British Right Flank.

As we turn around to see part of the attack from the British perspective.

To the right of the previous image things are even worse. French infantry are closing in on the bridge off the lower left of this photo. A baggage train has also been lost.

There is one glimmer of hope left. If you recall the successful attack by the Light Cavalry Brigade, the remnant of the 15th Hussars reformed behind French lines near the river on the French Back Table.

The 15th crossed back onto The Main Table and gallantly charged a French battalion in the rear to help. The latter about faced the third rank to shoot at the horsemen; easily done with individually based miniatures. However, the 15th was too weak to penetrate the foe, was repulsed and so....

The horse battery cantered across the Coa supported by Captain Magoo and a few more of the 9th Foot. Not much else escaped though....

Lord Paget exited the battlefield earlier with the 16th Light Dragoons and his personal troop of the 7th Hussars.

Our companionable participants observe the last British to cross the Coa. From left to right: John B., Jeff H., Earl K., John M., Jim P. (Der Alte Fritz), yours truly Bill P. and Chris K.

French players are in blue. British players are in scarlet.

Congratulations to the French!
--------------------

CLOSING REMARKS

1. This scenario was adapted from information generously given to Jim and I by Charles Grant. He has a winner here. Look for optimum details in his upcoming Wargaming In History - Peninsular Actions available before Christmas 2012.

2. Jim and I like this scenario a lot and will replay it on 10 November with seven participants. Between now and then new British and French forces are being raised. 

3. The terrain mat and river were custom-made by The Terrain Guy in Texas, USA. Put just about anything underneath to create gently rolling terrain. The bridge is from Miniature Building Authority. The lovely large trees were made by H.G. Walls.

4. Comments welcome below.
----------

Friday, September 7, 2012

CAMPAIGNS IN IBERIA
SOLVES A PROBLEM Part 1
----------------------------------------
Date: 25 August, 1810/2012

Location: Between Almeida and the Coa River Bridge

Rules: Batailles de l'Ancien Régime {BAR} adapted to Napoleonics

Situation: An outnumbered British force at first stands to fight and then must scramble to the Coa River Bridge to escape.
------------------------------------
TACTICAL ORDERS AND COURIERS
There is a problem but not like you might think.

When gaming pards become highly skilled in deployment, maneuver and rules, it becomes harder to surprise each other. Unforeseen and entertaining blows become fewer and fewer because both sides have become nearly evenly matched. Parries are frequent. We know each other too well.

One more thing and this is BIG. As players we tower above the tabletop seeing everything. It therefore becomes even easier to counter enemy plans. Legerdemain almost entirely vanishes. Players on one side often huddle to change plans, move reserves or do just about anything to impossibly stop the foe in unrealistic moments.

The solution is to introduce Tactical Orders and Couriers. What does this entail?

1. Each player is given a mission such as take the hill, use refused wing tactics, swing wide right, hold the village area, etc. These are Tactical Orders. Obey them.

2. Each player is represented by a miniature officer. You as that miniature officer will honorably make decisions only about what that little fellow can actually see or be told down on the table.

3. Each player will have couriers to send orders, information, ask for help, etc. It is important couriers are well-mounted and skillful riders simulated by double or treble light cavalry open order speeds. Thus, if centrally placed commanding General Alexander perched atop a high hill can actually see a dangerous enemy move on a flank, he can write a message, fold and place it under a courier and send off the galloper to the reserve to order a static regiment to the flank to help. The officer receiving the message can react the turn after receipt.

Let's see how this was reflected in the following game.


THE BEGINNING
Stand quietly boys and do your duty.
The French are coming.

Two kilometers to the left of the quiet Coa River Bridge is the Fortress of Almeida. Between the two we played a fun, stimulating and companionable 1:10 Napoleonic game in Iberia. This bridge was British extreme right flank.

Meanwhile near Almeida French line infantry and chasseurs a cheval busily approach the British extreme left flank held by riflemen.

 The same riflemen view the French advance.

Deeper inside the left flank is Der Alte's new 94th Regt.
Note distant riflemen of the previous two images.

Center: Major General Pettygree, staff,
more riflemen and the 9th Regiment.

A later view of the same rifles and the 9th Regt.

Better view of the 9th. Regt.

British Horse Artillery Battery on the unopposed right flank.
This would soon change.

The Coa River Bridge on the extreme right flank.
Captain Magoo's 5th Foot Grenadier Company
guards the bridge.


The End Of The Beginning
In the beginning French forces were not allowed to deploy opposite the British right flank. They instead deployed opposite the British left and center. Reasons were because French numbers nearly doubled those of their foe. The British did not need the French appearing everywhere! Plus, the French were not initially posted there historically. That soon changed.

As Polish Lancers shockingly arrived to disrupt a supply train heading for the bridge. The bridge is to the upper right of the image less than two feet away.

They were followed by two squadrons of French dragoons making for the bridge. You can just see a corner of the bridge in the upper right of the photo.

One squadron then turned to canter up and over the bridge. Would the other squadron follow and burst through Captain Magoo's unsupported Grenadier Company? Afterwards would the French dismount closing the British escape route?


Now Back To The Problem And Our Solution

This closer view of the 9th Foot reveals two mounted officers. The green jacket officer in charge here spotted a brigade of enemy cavalry crossing his front left to right about four feet away. He decided to send a courier shown with a message under the horse to his rear alerting....

The horse artillery battery to move forward and deploy to protect the right flank. Note the courier in the upper right of the photo. The courier delivered the information and then rode to the rear several more feet to advise Lord Paget to bring his British light cavalry forward as well.

Lord Paget obeyed. The 15th Hussars led the 16th Light Dragoons from the British Back Table to the Main Table on Turn 4.

On about Turn 5 the artillery is unlimbered and the light cavalry has arrived to act.

Here's the thing. As Bill, I knew French regiments of cavalry were heading for the British right flank on Turn 2. I could have shifted the artillery and Paget's cavalry earlier than turns 3 and 4. I did not because the officers on the table had to discern what was happening from their perspective an inch above the table, a courier needed dispatching and recipients needed time to react. Thus, real world reasonable delays were built into my response.

As a result, Captain Magoo's grenadiers were feeling very isolated and lonely. Nobody else was there to stop a French breakthrough. Had I not played the game with delays described, this moment would never have happened. Paget would have gotten here before the French dragoons cantered onto the bridge and this exciting moment would never have occurred.

Come back next time to see what happened!


Closing Remarks:

1) Some of the information for our scenario was personally provided by Charles Grant, "from his next publication, Wargaming in History - Peninsular Actions  -  which will be out well before Chritsmas." Jim and I sincerely thank him for our adaptation of his Coa Bridge scenario. We like this scenario so much we plan do it again in two months. Seven players are needed for our version.

2) See: http://www.napoleon-series.org/military/virtual/almeida/c_almeida.html for information about The Fortress of Ameida and its geographical and tactical importance in the region by Robert Burnham.

3) Most miniatures are Elite Miniatures: http://www.eliteminiatures.co.uk/products.htm Others are from Peter Gilder's Connoisseur available from Bicorne Miniatures: http://www.bicorne.net/catalog/index.php?cPath=292_102&osCsid=8cb021725bf323ebc47d14d244f1449d

4) The bridge is from Miniature Building Authority: http://miniaturebuildingauthority.com/index.asp

5) Your remarks are very welcome at "Comments" below.